Sunday, January 30, 2011

The K1P1 Knitting Stitch Pattern - Not Just Ribbing

K1P1 Ribbing


When you think of K1P1, your first thought is likely K1P1 ribbing, shown in the upper portion of this knitting sample.  It is a stitch pattern that is used frequently as a hem treatment.  It has a lot of width-wise compression.

The easiest stitch pattern for this is to cast on an even number of stitches, and then repeat Row 1 over and over again:
Row 1: *K1. P1. Rep from * to end.

This stitch pattern is an example of the concept of Knit the Knits and Purl the Purls.


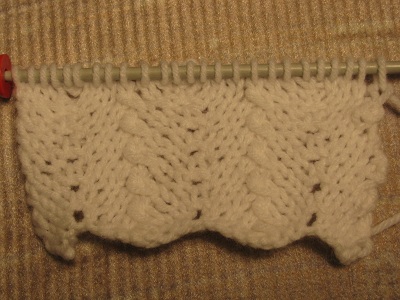
Seed Stitch (aka Moss Stitch)

But this same basic stitch pattern can do much more.

This photo shows Seed Stitch in progress. 


It feels like K1P1 Ribbing, but you Knit the PURLS and Purl the KNITS instead.

In the photo, the next stitch should be a Knit.

The stitch pattern for Seed Stitch is also a 1-row repeat:

Cast on an odd number of stitches.

Row 1: K1. *P1. K1. Rep from * to end.

Double Moss Stitch


This stitch pattern consists of two rows of ordinary K1P1 ribbing, and then two more rows with the stitches shifted one stitch.  There is a lot of texture in the knitted fabric.  Here is the stitch pattern - it is a 4-row repeat:

Cast on an even number of stitches:
Row 1: * K1. P1. Rep from * across.
Row 2: Rep Row 1.
Row 3: * P1. K1. Rep from * across.
Row 4: Rep Row 2.

Fleck Stitch


And finally, another variation, this one with a K1P1 row stuffed into the middle of some Stocking Stitch rows.

This pattern stitch also has a 4-row repeat:

Cast on an even number of stitches
Row 1 (RS): Knit.
Row 2: Purl.
Row 3: Knit.
Row 4: * K1. P1. Rep from * across.

Conclusion


This article just touches the surface of what you can do with the simple K1P1 knitted stitch pattern.

For more information, check out the Read Knitting Patterns website.

Monday, December 27, 2010

Read a Knitting Pattern for Mistake Stitch Rib

Background

Mistake Stitch Rib is one of many variations of the basic K2P2 ribbing.  It forms a reversible fabric with an interesting texture and a one-stitch-wide strong vertical rib every 4 stitches.


Heads Up
There are four different variations of Mistake Stitch Rib, depending on the number of stitches that are cast on.  This article discusses one of them – the easiest version, in my opinion.

The pattern instructions
Cast on a multiple of 4 stitches plus 3.
Row 1: *K2. P2. Rep from * until 3 sts rem.  K2. P1.
Rep Row 1 to desired length.

Personal opinion: I don’t like to keep checking whether there are 3 stitches left.  So here is how I knit it:
Row 1: *K2. P2. Rep from * until you have run out of stitches.
That’s a non-standard knitting instruction, but it works for me!

About This Pattern Stitch
As you can tell from the pattern instructions, Mistake Stitch Rib is a variation of simple K2P2 ribbing, with all of those repeated K2P2’s.  But it is a different pattern.  And the techniques that you use to figure out where you are when you are knitting K2P2 ribbing don’t apply with Mistake Stitch Rib.

When you work K2P2 ribbing on a number of stitches that is divisible by four, then every row is the same: (*K2. P2. Rep from * to end. ) And with ordinary K2P2 ribbing, you knit the knit stitches and purl the purl stitches.

But with Mistake Stitch Rib, it is not so convenient.

That’s because there is an odd number of stitches on the needle.  So the Knits and Purls do not line up on top of each other as nicely as they do for K2P2 Ribbing.

This makes it is easier to get lost – if you have to set your needles down to attend to a toddler’s potty training in the middle of a row, you might be lost when you get back to your knitting.

If You Get Lost
Look at the knitted fabric: there is a strong one-stitch-wide rib facing you, every four stitches.

The first strong rib is on the right-most edge of the fabric as it faces you.

On the old or holding needle, find the top of the strong single-stitch rib that is closest to the point of the needle.  That is where you will START a K2P2 pattern repeat.  If that rib is the first stitch on the holding needle, you’re in great shape – just K2P2 and carry on.  Otherwise, you will have to count back to determine where you are in the pattern.  For example, if the rib is the fourth stitch on the holding needle, you have to do the last three stitches of the K2P2 pattern repeat – in other words, K1P2.

This photo shows where a repeat of K2P2 stitches are to be worked.


Conclusion
The knitted fabric that results from this stitch is reversible.  It has some width-wise compression, though not as much as with K2P2 rib.  And it has an interesting texture between the ribs.  It would work quite well as a scarf.

To see a detailed explanation of a pattern for a pullover using this pattern stitch, check out the Read Knitting Patterns website, which is devoted to helping beginner knitters learn how to read knitting patterns.


Wednesday, November 10, 2010

How to Read Mosaic Knitting Patterns

Introduction to Mosaic Knitting

Mosaic Knitting, also known as Slip-Stitch Colorwork, is an easy way to create beautiful two-color patterns while knitting.
To understand Mosaic Knitting, think like an artist for a bit.  Picture a series of adjacent stripes in two colors – let’s use black and white for the purposes of this explanation.  Now, paint narrow white bridges crossing from one white stripe to an adjacent white stripe, over the black stripe.  Paint a few narrow white bridges.  Now, paint some narrow black bridges, crossing from one black stripe to an adjacent one, over a white stripe.  Just do not have a white bridge connecting to a black bridge.
What does this mean to a knitter?

The stripes are actually two rows of white alternating with two rows of black.  They could be worked using Stocking Stitch (alternating K 1 row and P 1 row) or Garter Stitch (K every row).

And the bridges are Slip Stitches.

This photo shows a two-stitch-wide white bridges over a black stripe.


Example of Mosaic Knitting with Slip Stitches

To explain this further, let’s pretend that you just have one white bridge between two white stripes, over a black stripe (a 6-row sample).
Work two rows in white (the first row is a Right Side row).  Now, start to work the third row in black.  When you come to where the bridge should be, Slip 1 stitch purlwise with the yarn in the back of the needles.  Then work the rest of the row.  On your needle will be one single white stitch, with all of the rest in black.  That white stitch is the slipped stitch.
Now, you have to work the second row of black (or Row 4).  There are two rules for the second row of a stripe:
  • If the stitch on the old needle is the same color as the yarn (in this case black), knit or purl it, depending on what the pattern says.
  • If the stitch on the old needle is the other color, Slip it purlwise with the yarn in the front of the knitted fabric (facing you).
At the end of the second row of black, your needle will still just have one single white stitch (the stitch that has been slipped twice), with all of the rest in black.

Now, work two rows of white.  On the first of these two rows (Row 5 of the sample), when you get to the stitch that was slipped, knit into that stitch as though it were not special at all.  The slipped stitch has stretched vertically quite a bit since it was first created in Row 2.  The slipped stitch has now formed a bridge between the two white stripes over the black stripe.  And remember, even though the bridge is white, it was actually formed while making a black stripe.  I like to think of the black stripe as pulling up a bridge stitch from the previous white stripe.

But in Real Life...

Of course, most Mosaic Knitting patterns are much more complex than the little 6-row sample that I just described.  For example, on the second stripe (the black one), there would be many Slip-Stitch bridges formed.  And then the third stripe would both finish the Slip-Stitch bridges by knitting into them, but would also pull up other stitches from the black stripe, to form some black bridges over the new white stripe.

To help you read the knitting pattern for Mosaic Knitting, here is an example that shows what has been described above:
  • Row 1 (RS): With B, k1, *(sl 1 wyib, k1) twice, sl 1 wyib, k2, (sl 1 wyib, k1) 2 times; rep from * across.
  • Row 2 and all WS rows: With same color used on previous row, p the knit sts of previous row, sl wyif the sl sts of previous row.
And that’s all that you need to know to get started with read a knitting pattern for Mosaic Knitting.

For more information, examples, and patterns, see the Read Knitting Patterns website.

Friday, October 29, 2010

Read Knitting Patterns for Ripple Stitch Afghans


Knitted Ripple Stitch Afghans are much simpler to make than might appear from the actual knitting pattern.

This article will explain the basic concepts behind the Ripple Stitch.


Key features of Ripple Stitch


  • The knitted fabric looks like a big zigzag, with mountains and valleys.  The bottom and top edges look like the letter W.  This is formed by matching pairs of double-increases (where 3 stitches come out of 1) and double-decreases (where 3 stitches become 1).
  • The pattern is typically just a two-row repeat, with a complex row alternating with a plain row.
  • The number of stitches on the needle is the same from one row to the next.
  • Often, projects made using the Ripple Stitch are made in multiple colors.  The best part is that you only use one color of yarn per row.
The main repeat in Ripple Stitch usually consists of a double-increase, then knitting a number of stitches, then a double-decrease, then knitting another set of stitches.  Typically, the number of stitches between the double-increases and double-decreases is the same.

A project made with Ripple Stitch is usually symmetrical, so outside the main repeat is one more double-decrease or double-increase.  But this would change the number of stitches on the needle.  So a double-decrease is balanced by a single-increase at each side. And a double-increase is balanced by a single-decrease at each side.

Example of a Ripple Stitch pattern row


Row 2: K2tog. K3. *(K1. P1. K1.) all in next st. K3. Sl1. K2tog. Psso. K3. Rep from * to last 8 sts. (K1. P1. K1.) all in next st. K3. Sl1. K1. Psso.
Let’s break this down a bit.
  • The beginning:  K2tog. K3.
  • The repeat: *(K1. P1. K1.) all in next st. K3. Sl1. K2tog. Psso. K3.
  • The ending: (K1. P1. K1.) all in next st. K3. Sl1. K1. Psso.
Look at the repeat first.

The phrase “(K1. P1. K1.) all in next st.” is a double-increase.  The phrase “Sl1. K2tog. Psso.” is a double-decrease.
The K3 in the middle and at the end of the repeat is the distance between the double-increases and double-decreases.
So, just as described above, the repeat consists of: double-increase, K3, double-decrease, and K3.

Now, add the little bits that make the pattern symmetrical.  Look at both the beginning and ending parts of the row:
  • The beginning:  K2tog. K3.
  • The ending: (K1. P1. K1.) all in next st. K3. Sl1. K1. Psso.
The ending starts with the double-increase.  There’s the symmetry.   So all that’s left are the side sections.
The beginning starts with a single-decrease, the K2tog.  And the ending finishes with another single-decrease, the SKP, or Sl1-K1-PSSO sequence.  These two types of decrease have a different slant to them, so they provide symmetry.

Between the increases and decreases is that K3 bit – just like in the repeat.


Conclusion

Usually, the only differences between various Ripple Stitch knitting patterns are the type of double-increase and the number of stitches between increases and decreases.

That’s how easy it is to read – and understand – the knitting pattern for a Ripple Stitch Afghan.

Wednesday, October 20, 2010

Read Knitting Patterns with Many Colors

Multi-Color Knitting Patterns - Introduction


If you see more than one color in the photo of a knitting pattern, you will probably be using at least one ball of yarn for each color. (There are exceptions, and I’ll talk about them later.)

The confirmation is in the Materials section of the header of the knitting pattern. You might see something like the following:
  • CA: Black - 1 ball
  • CB: Red - 1 ball
In this example, CA refers to the the Color A, the first color, the color that may be used most, and CB refers to Color B, or the second color. The two colors might also be called:
  • MC and CC (for Main and Contrasting colors)
  • MC and CA (for Main and Color A)
  • A and B (for color A and color B)
No, there is no consistency in what you might see. But the list above covers most cases. Of course, if there are more than two colors, then the list of letters will be extended.
  • A, B, C, D, E would be for 5 colors. There is no hint as to which is used most.
  • MC, CA, CB, CC, CD would be for a main color with 4 different contrasting colors.
  • The MC and CC combination is only used for 2 colors, a Main and a Contrasting color.
You do not need to follow the color choices as written by the pattern designer. Of course, if it is a Valentine-related project, you probably will want to use red and white. But you might decide to switch the use of the red and white – the knitting police won’t know! Otherwise, do what you want – let your own imagination shine through.

In the Instructions Section

The knitting pattern will usually have the word WITH before whatever color code letters are used. Examples:
  • Row 1: (RS). With MC, purl across.
  • Row 1: (RS). With A, K2. With B, K2. With A, K2.

The Exception: A Single Ball of Yarn with Multiple Colors


Once upon a time, if you saw a knitting pattern photo with lots of colors, you knew immediately that you would need balls of yarn in each of those colors.

These days, there is always the possibility that the pattern designer is taking advantage of one of the many multi-colored yarns that the manufacturers provide. They may be variegated, self-striping, or self-patterning. One type of yarn is especially designed for sock knitting, so that an interesting color pattern emerges as you are knitting.

You will know this to be the case when you see a reference to only one color in the Materials section of the header of the knitting pattern. And usually that will be a specific yarn. If you substitute yarns, you will likely not be able to duplicate the effect.

Thursday, October 14, 2010

Using double pointed needles for circular knitting


Every so often, you might read a knitting pattern calling for double pointed needles (abbreviated DPN). Usually, the patterns call for 4 such needles, which is a good thing, since when you buy them they come in packages of 4.

A reference to DPNs is a clue that you will probably be knitting a small tube of some form (examples: hats, socks, mitts, leg warmers).

Here are some tips for success.

Casting on
When you cast on, ignore the extra needles. Use whichever cast-on method you want, and get all of the stitches onto one needle.

Divide the cast-on stitches
The pattern will usually say to divide the stitches evenly onto 3 needles. There will be one needle left over.

Sometimes, you will read a pattern that says to cast on a number of stitches that is NOT divisible by the number of needles. When that happens to me, my philosophy is that close is good enough. As long as the number of stitches on each needle are roughly equal, I’m satisfied.

Position the needles so that the cast-on ridges are all pointing to the inside of the triangle. At this stage, it is VERY IMPORTANT that the stitches or needles do not get twisted.


Start to knit

The instructions usually say to join in a round (you will be knitting in rounds, not rows).

The ball yarn is connected to the last stitch that was cast on. The needle holding that last stitch will not be used for a while, but the yarn will be used right away.

The most significant stitch at this point is the very first stitch that was cast on (usually the slip knot at the beginning of the cast-on process).

Hold the needle containing that very first cast-on stitch – this will be your Old or Holding Needle (usually the left-hand needle). Using the empty needle as your New or Working Needle, work a Knit stitch into that very first cast-on stitch.


Ignore, as best as you can, the other needles. Just make sure that the stitches don’t fall off of those needles. If you cast-on loosely, it might be in your best interests to put stitch protectors on both ends of the needles that you are not using.

When you finish knitting the stitches on one needle, there will be a new empty needle. This will become your new working needle, and the next needle will be the new holding needle.

Too much yarn between needles


Sometimes, there’s a really long strand of yarn between the last and first stitches. Don’t worry too much about that. This extra length will often work itself into the adjacent stitches eventually. However, a key method to achieve success is to always knit the first stitch on a needle very tightly.

Circular knitting with double pointed needles has some interesting parts, but on the whole it is not that difficult. Try it.

Saturday, October 9, 2010

Read Knitting Patterns for Multi-Size Garments

Reading Multi-Size Knitting Patterns


If you are planning on making a garment, chances are good that you will be reading a knitting pattern for multiple sizes. There will be many places in the pattern where you will need to know the number that applies to the size you are trying to create. This article will help you to choose the appropriate number.

Inside the Pattern


The first thing that you have to look at is in the header of the knitting pattern. Here is where the pattern designer tells you which sizes are available.

As a rule, the various sizes are shown as in the following examples, all for 5 different sizes:

  • 32 (34, 36, 38, 40)
  • S (M, L, XL, 2XL)
  • 6 (8, 10, 12, 14)

This format of specifying the sizes tells you that whenever you see a sequence of a number followed by 4 numbers in parentheses, you are looking at a multiple-size specification.

If you are making the smallest size, you will use the first number, the one outside the parentheses.

If you are making the largest size, then you will use the last number inside the parentheses.

For example, if the instructions say "Cast on 90 (95, 100, 105, 110) sts.", then:

  • if you are the largest size, cast on 110 stitches.
  • if you are the fourth size, cast on 105 stitches.
  • if you are the third size, cast on 100 stitches.
  • and so on.

Any other statements with a similar sequence of numbers is treated similarly:
Cast off 4(5, 6, 7, 8) sts at beg of next 2 rows.

All you have to do is remember which of those numbers is for you.

Hints


One suggestion that will help to make your knitting life happier is to read through your knitting pattern, before you start to knit, looking for every occurrence of the multi-size sequence of numbers.

Highlight the one that applies to you.

If you are the second-from-the-smallest size, then highlight the first number inside the parentheses.

Another hint: if you would like to learn more, sign up for the free e-course on How to Read Knitting Patterns.

More about the sizes


A 40 could mean a 40" bust. Or it could mean the finished size.

And do S/M/L/XL/2XL mean the same as in ready-to-wear?

If you are fortunate, the pattern writer also includes some other clues as to what the size means.

Some patterns say that the Size refers to the finished size of the garment. Some also include the corresponding bust/chest measurement (if the garment is a sweater). Some patterns will indicate whether the garment is fits loosely or snugly.

But in some cases you are on your own for figuring out what the size number really means.

One method you can use is to take advantage of the gauge specification. But you will need to do a bit of math.

Example:

If the gauge says 20 stitches in 4 inches with Stocking Stitch, and the Back and Front of a Stocking Stitch Sweater each have 100 stitches on the needle just below the armhole shaping, then there are 200 stitches around the chest/bust.

200 stitches is ten 20-stitch chunks, or ten 4-inch chunks, or 40 inches finished size. With the standard of a couple of inches of ease, then if your chest/bust is 38 inches, this will be a comfortable fit. If the sweater is designed to fit snugly, though, it would work with a chest/bust of 42 inches (that's called "negative ease").

Conclusion


Now you know how to interpret a knitting pattern for multiple sizes. It's time for you to start making a sweater that's the correct size.